Note: To follow this tutorial you should have a basic understanding of C.
Note: This is a cross-platform adaptation of my Linux/Xlib tutorial, so Windows/Mac users can follow my other tutorials.
Alright, let's open a window on Windows, Mac or Linux in C with SDL! First let me show you what you'll end up with at the end of this tutorial:
If you're on mobile that might look like a plain black window. Rest assured there is one white pixel moving around near the middle! And don't worry about how choppy that looks - that's just due to the way I recorded it and converted it to a gif.
There's a little bit more in there than just getting a window open. I don't want to waste your time breaking this stuff up into 12 sub-tutorials so I'm putting this all in one. After reading this tutorial you'll have a window with a graphics buffer and keyboard input so you can actually start making things happen on-screen.
Before getting to the code I want to address the fact that I'm using SDL here. I would prefer to make a tutorial each for Windows and Mac similar to my Xlib tutorial, using the lowest-level library for that platform to get things up and running. However I don't own a Mac or a copy of Windows, and I want to get on to making more interesting tutorials about sprite blitting, 3d rasterization and whatnot. If you're looking for something similar to my Xlib tutorial but for Windows/Mac I'm afraid you'll have to look elsewhere. If you find something good e-mail me and I'll refer people to it if it looks good.
First you'll need to install the SDL2 development files. On Ubuntu it's as simple as typing the following into the terminal:
sudo apt install libsdl2-dev
On Windows/Mac follow the official guidelines on SDL's website: https://www.libsdl.org/download-2.0.php
Make sure to download the "Development Libraries".
The full code for this tutorial can be downloaded here: opening_a_window_with_sdl.c
To compile and run that code write the following in a terminal the same directory as the file:
Linux:
gcc opening_a_window_with_sdl.c -o bin -lSDL2
./bin
Windows (developer console x64). Those include/library paths will probably need editing on your machine:
cl opening_a_window_with_sdl.c -Ilibraries/include/ -link libraries/lib/SDL2.lib libraries/lib/SDL2main.lib legacy_stdio_definitions.lib -SUBSYSTEM:CONSOLE
opening_a_window_with_sdl.exe
Yes, compiling on Windows is just as much of a nightmare as it looks. Good luck!
Mac: I've got no clue since I don't have access to a Mac. If you have an old Macbook lying around send me an e-mail and I'll gladly take it off your hands!
While reading this tutorial I highly recommend you have the SDL2 documentation open: https://wiki.libsdl.org/CategoryAPI
First thing, let's do the barest minimum to open a window.
#include<SDL2/SDL.h>intmain(int argc, char* argv[]){
SDL_Init(0);
SDL_Window* window = SDL_CreateWindow("Nick's SDL2 window", SDL_WINDOWPOS_UNDEFINED, SDL_WINDOWPOS_UNDEFINED, 1280, 720, SDL_WINDOW_RESIZABLE);
for(;;){}
return0;
}
Pretty simple. When running this please note the infinite loop near the bottom. Pressing the 'x' in the top of your window won't close it, so use your task manager or equivalent to kill the process.
So with this pretty simple code you've got a window open! I'll explain the code a bit but you can read the SDL2 docs if you want the minutia.
SDL_Init tells SDL which subsystems we want to initialize. We're going to use SDL's subsystems as little as possible since my tutorials are all about doing things yourself, so we can pass 0 for now. Check that link for the possible flags.
SDL_CreateWindow obviously creates the window. We give it a title, position, size and some flags. You can pass 0 for the flags and still get a window but I figured I might as well drop that flag in now rather than having to add it later.
    // After creating the window, before the infinite loop
    SDL_Surface* canvas = SDL_GetWindowSurface(window);
Now we've got a window that actually looks like a normal window! This function creates a valid surface for our window if one doesn't exist and gives us a pointer to it. Doing that gives our window a "fancy" black background.
Now let's allow our program to be closed properly.
// Top of file#include<stdbool.h>// Replace for(;;){} with thisbool game_running = true;
while(game_running){
SDL_Event e;
while(SDL_PollEvent(&e)){
switch(e.type){
case SDL_QUIT:{
game_running = false;
}break;
}
}
SDL_UpdateWindowSurface(window);
}
Now the game continuously loops, checking for events and handling the SDL_QUIT event. Now you can close the window with the X or ALT+F4. SDL_PollEvent returns 1 if there is a pending event and passes that event to our event pointer. The rest of the event code is pretty self-explanatory, but the odd code out is that call to SDL_UpdateWindowSurface. I noticed while writing this tutorial that the earlier code produced a black background without this line, but after adding the event handling the black background disappeared so I had to add in this. Pretty strange behaviour but hey, that's what you get when you use third-party libraries! Anyway this just copies the window surface to the screen.
Next let's handle some input so we can close the window with the escape key.
            // Inside switch(e.type)
                case SDL_KEYDOWN:{
                    switch(e.key.keysym.sym){
                        case SDLK_ESCAPE:{
                            game_running = false;
                        }break;
                    }
                }break;
All we have to do is handle the SDL_KEYDOWN event type and check the keysym. It's a bit of a weird variable to access but again, odd APIs are what you get when you use other peoples' libraries. I bet you'd think my API design is weird too aye! Anyway, we check for SDLK_ESCAPE and quit the game.
Now let's get something on the screen other than a black window!
// Top of file#include<stdint.h>// End of main loop before SDL_UpdateWindowSurface
*((uint32_t*)(canvas->pixels) + 128*1280+64) = 0xffffffff;
I included stdint just so I can use uint32_t and other such types. If you'd rather you can use unsigned int* and the other equivalents but I find the stdint types to be clearer.
In our main loop we set a single pixel to 0xffffffff before updating the window surface. Now you should see one white pixel at the 64,128 coordinate. That line indexing the pixel looks a little crazy so I'll explain.
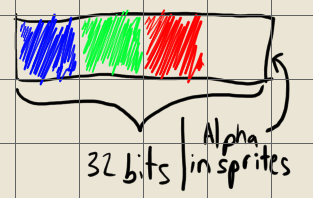
We cast our canvas to a uint32_t pointer, which is the size of one pixel (4 bytes). Each pixel is represented by at least 3 bytes - Blue, Green and Red. That 4th byte in this case is just a buffer to keep the pixels aligned on 32-bit memory addresses but in the case of sprites that last byte will represent the Alpha (transparency) channel.
To get to our desired pixel from there we just add Y times the Width plus X. Our pixels are stored as horizontal rows so by adding Y times Width that moves us down a number of pixel rows, then adding X gets us across to the correct pixel. Try changing the X and Y coordinates of the pixel to get a better understanding of the math.
Then we dereference that pixel and assign it a value. I wrote the pixel value in hexadecimal for clarity. In hex each byte is visible as a pair of digits, like so: 0xAARRGGBB. Go ahead and mess with that value, try making the pixel green, blue, red and combinations of those colours. Also notice that the AA byte has no apparent effect. In the window canvas those bytes are not used for rendering, but in other pixel arrays they are usually used for alpha (transparency).
Alright, now let's make it interactive! First I replaced all the instances of 1280 and 720 with the variables window_width and window_height.
// Before main loopint x = 0, y = 0;
// Inside SDL_KEYDOWN switch(e.key.keysym.sym)case SDLK_UP:{
if(--y < 0){
y = 0;
}
}break;
case SDLK_DOWN:{
if(++y > window_height-1){
y = window_height-1;
}
}break;
case SDLK_LEFT:{
if(--x < 0){
x = 0;
}
}break;
case SDLK_RIGHT:{
if(++x > window_width-1){
x = window_width-1;
}
}break;
// End of main loop
*((uint32_t*)(canvas->pixels) + y*window_width+x) = 0xffff0000;
Now we use an x and y variable to index our pixel and move it around with the arrow keys. Of course we have to make sure it doesn't go out of the array bounds or we'll crash, which is what all those if statements are about. That's nice enough, but what about being able to hold an arrow key down to continously move the dot? If you try it now you'll get a small delay, then it'll start moving. That's key repeat at work - the thing that lets you hold the backspace key to delete a bunch of characters. However in games we don't want our character to take 1 step, stop for 250 milliseconds then start jittering forward every other frame with a key repeat. Instead we just want to check each frame if the key is still pressed and move accordingly. I deleted the movement code we had in the KEYPRESS event check and wrote this:
// Before main loopconstuint8_t* keyboard = SDL_GetKeyboardState(NULL);
// Before setting the pixelif(keyboard[SDL_SCANCODE_UP]){
if(--y < 0){
y = 0;
}
}
if(keyboard[SDL_SCANCODE_DOWN]){
if(++y > window_height-1){
y = window_height-1;
}
}
if(keyboard[SDL_SCANCODE_LEFT]){
if(--x < 0){
x = 0;
}
}
if(keyboard[SDL_SCANCODE_RIGHT]){
if(++x > window_width-1){
x = window_width-1;
}
}
We create a uint8_t pointer to hold our keyboard state values and ask SDL to give that to us. We index this array with scancodes (SDL_SCANCODE_) instead of keycodes (SDLK_). Scancodes represent the physical keys on the keyboard whereas keycodes represent virtual keys mapped to those physical keys. Using SDLK_ESCAPE inside our event check should work for any keyboard, regardless of country/language/layout. However SDL_SCANCODEs may not work on certain keyboards. It's outside the scope of this tutorial but you may be able to map the correct keys using SDL_GetScancodeFromKey.
Now pressing and holding the arrow keys works as expected, constantly moving the character as long as said keys are held.
Before we move on from keyboard handling let's disable key repeats. As mentioned before, holding down a key will send the same event over and over after an initial delay and if you want to do something only when a key is physically pressed this might bugger you up. So after receiving an SDL_KEYPRESS event we can add a little check:
// After case: SDL_KEYDOWNif(!e.key.repeat){
switch(e.key.keysym.sym){
case SDLK_ESCAPE:{
game_running = false;
}break;
}
}break;
That's it! Now we'll properly avoid processing repeat key events.
Alright, now let's imagine our little pixel is a character. Well they're leaving an embarrassing streak across the screen so let's clear the pixel buffer every frame before drawing.
// Top of code#include<cstring>// Start of main loopmemset(canvas->pixels, 0, window_width*window_height*4);
Good as gold! Memset takes our pixel buffer pointer and sets a number of bytes to the value we gave it. Remembering that each pixel is 4 bytes, we clear width x height x 4 bytes.
Now there's only one thing left. The framerate is crazy! Let's add some timing code so we can limit how often we're updating our window, and save our CPU fans from having to wind up to 100% every time the game runs.
// Top of code#include<cstdio>// Before main loop
Uint64 ticks_per_second = SDL_GetPerformanceFrequency();
Uint64 target_frame_time = ticks_per_second / 60; // 60 = target framerate
Uint64 frame_start;
Uint64 frame_finish;
frame_start = SDL_GetPerformanceCounter();
// After SDL_UpdateWindowSurface
frame_finish = SDL_GetPerformanceCounter();
float sleep_time_in_ticks = (float)target_frame_time - (float)(frame_finish - frame_start);
float sleep_time_in_ms = sleep_time_in_ticks/ticks_per_second*1000.f;
if(sleep_time_in_ms > 0){
SDL_Delay(sleep_time_in_ms);
}
frame_finish = SDL_GetPerformanceCounter();
float delta = (float)(frame_finish - frame_start) / (float)ticks_per_second;
frame_start = frame_finish;
char title[30];
sprintf(title, "Nick's SDL2 window. FPS: %0.02f", 1.f/delta);
SDL_SetWindowTitle(window, title);
So we get SDL's high performance timer frequency, which varies from platform to platform. Calculate our target ticks per frame by dividing 1 second's worth of ticks by the number of frames we want to display. Take a tick count at the start of the game and at the end of the frame calculate how many ticks have passed. Calculate the sleep time in ticks by subtracting the elapsed ticks from the target ticks - note the (float) casts. I noticed in testing that sometimes that value evaluated to a negative which, since the operands are unsigned, wrapped around to a massive number, causing the program to sleep for a huge amount of time. (float) casts allow the number to go negative without issue. Then we call SDL_Delay. Unfortunately this function only has a millisecond resolution, so we truncate our sleep time to milliseconds and delay by that amount. You may be able to sleep by a smaller amount of time by using platform-specific code, as in my Linux Xlib tutorial.
After we've slept to take up our complete frame time we get the actual elapsed time this frame, including the sleep. For now we're just using this delta value to display the framerate but in actual game code you'd use that as a factor in your physics/movement/animations to keep things going at the correct speed regardless of framerate.
We set frame_start to frame_finish, then create a char* buffer to store our window title. If you write anything longer than what I have with sprintf you'll have to change the size of the title buffer to hold that many characters. SDL_SetWindowTitle lets us use the window title bar to display the framerate. It should have some rapidly changing number around 60. It won't say exactly 60 simply because real-time timing is difficult on computers, and SDL_Delay's millisecond accuracy makes that even worse. If you end up using a graphics card via an API like OpenGL in the future you'll be able to wait for vblank to synchronize with the monitor's refresh rate, but this type of timing serves well enough.
I'd say we're in pretty good shape at this point, but before ending this tutorial I'll show you how to handle window resizing. Just a bit of housekeeping aye?
            // Inside switch(e.type)
                case SDL_WINDOWEVENT:{
                    switch(e.window.event){
                        case SDL_WINDOWEVENT_SIZE_CHANGED:{
                            window_width = e.window.data1;
                            window_height = e.window.data2;
                            // SDL_FreeSurface(canvas);
                            canvas = SDL_GetWindowSurface(window);
                        }break;
                    }
                }break;
We check for the SDL_WINDOWEVENT type, then check if that window event is an SDL_WINDOWEVENT_SIZE_CHANGED event. Set the new window_width and window_height and get the new window surface. I added and commented out a line freeing the previous window surface just to point out that SDL frees that in the background when the window is resized. To verify that open your task manager (or equivalent), find your program and watch the memory usage while resizing. Mine goes from 11mb -> 4mb -> 12mb -> 6mb -> 10mb as I make the window larger and smaller, so the memory is certainly being deallocated.
There's one last issue to quickly solve with resizing and that's keeping our x/y values in bounds! When we set our pixel we are taking the pointer to the first pixel on the screen and moving along to our x,y coordinate. If this goes out of the bounds of the pixel buffer we may get an access violation, or worse, we might get no error at all! This would mean we may corrupt other parts of our program's memory without realizing it, so let's do a bounds check on resize.
// Top of file
#defineMin(a, b) ((a)<(b) ? (a):(b))
// Inside window resize event
x =Min(x, window_width-1);
y =Min(y, window_height-1);
In practice you'll want to access the pixel buffer with a function like SetPixel(x, y, colour) which has bounds checking built in.
That's it for this tutorial! If you have any issues compiling the code just download the full source and compile that to make sure it works, then examine the differences closely to see what you've done wrong.
Full source code: opening_a_window_with_sdl.c
Please send me an e-mail with the button below if you have any problems with or suggestions for the tutorial, if this tutorial helped you out or if you have requests for future tutorials.
Cheers.
Thanks to Froggie717 for criticisms and correcting errors in this tutorial.

 To get to our desired pixel from there we just add Y times the Width plus X. Our pixels are stored as horizontal rows so by adding Y times Width that moves us down a number of pixel rows, then adding X gets us across to the correct pixel. Try changing the X and Y coordinates of the pixel to get a better understanding of the math.