
Drawing Pixels to a Win32 Window in C with GDI
Note: To follow this tutorial you should have a basic understanding of C. This tutorial is also available as a video. In this tutorial I'll show you how to draw pixels to a back buffer and copy that buffer to a Win32 window with GDI - Windows' native software rendering library. GDI is much less efficient using the graphics card via an API like OpenGL, but it’s easier to set up and will work on every Windows computer regardless of graphics hardware and driver versions. Firstly, here's the code (or download here): Note: Click any of the hyperlinked words to visit the MSDN documentation page for them. Note: I've dimmed all of the code not specific to the subject of the tutorial.#define UNICODE
#define _UNICODE
#include <windows.h>
#include <stdbool.h>
#include <stdint.h>
static bool quit = false;
struct {
int width;
int height;
uint32_t *pixels;
} frame = {0};
LRESULT CALLBACK WindowProcessMessage(HWND, UINT, WPARAM, LPARAM);
#if RAND_MAX == 32767
#define Rand32() ((rand() << 16) + (rand() << 1) + (rand() & 1))
#else
#define Rand32() rand()
#endif
static BITMAPINFO frame_bitmap_info;
static HBITMAP frame_bitmap = 0;
static HDC frame_device_context = 0;
int WINAPI WinMain(HINSTANCE hInstance, HINSTANCE hPrevInstance, PSTR pCmdLine, int nCmdShow) {
const wchar_t window_class_name[] = L"My Window Class";
static WNDCLASS window_class = { 0 };
window_class.lpfnWndProc = WindowProcessMessage;
window_class.hInstance = hInstance;
window_class.lpszClassName = window_class_name;
RegisterClass(&window_class);
frame_bitmap_info.bmiHeader.biSize = sizeof(frame_bitmap_info.bmiHeader);
frame_bitmap_info.bmiHeader.biPlanes = 1;
frame_bitmap_info.bmiHeader.biBitCount = 32;
frame_bitmap_info.bmiHeader.biCompression = BI_RGB;
frame_device_context = CreateCompatibleDC(0);
static HWND window_handle;
window_handle = CreateWindow(window_class_name, L"Drawing Pixels", WS_OVERLAPPEDWINDOW | WS_VISIBLE,
640, 300, 640, 480, NULL, NULL, hInstance, NULL);
if(window_handle == NULL) { return -1; }
while(!quit) {
static MSG message = { 0 };
while(PeekMessage(&message, NULL, 0, 0, PM_REMOVE)) { DispatchMessage(&message); }
static unsigned int p = 0;
frame.pixels[(p++)%(frame.width*frame.height)] = Rand32();
frame.pixels[Rand32()%(frame.width*frame.height)] = 0;
InvalidateRect(window_handle, NULL, FALSE);
UpdateWindow(window_handle);
}
return 0;
}
LRESULT CALLBACK WindowProcessMessage(HWND window_handle, UINT message, WPARAM wParam, LPARAM lParam) {
switch(message) {
case WM_QUIT:
case WM_DESTROY: {
quit = true;
} break;
case WM_PAINT: {
static PAINTSTRUCT paint;
static HDC device_context;
device_context = BeginPaint(window_handle, &paint);
BitBlt(device_context,
paint.rcPaint.left, paint.rcPaint.top,
paint.rcPaint.right - paint.rcPaint.left, paint.rcPaint.bottom - paint.rcPaint.top,
frame_device_context,
paint.rcPaint.left, paint.rcPaint.top,
SRCCOPY);
EndPaint(window_handle, &paint);
} break;
case WM_SIZE: {
frame_bitmap_info.bmiHeader.biWidth = LOWORD(lParam);
frame_bitmap_info.bmiHeader.biHeight = HIWORD(lParam);
if(frame_bitmap) DeleteObject(frame_bitmap);
frame_bitmap = CreateDIBSection(NULL, &frame_bitmap_info, DIB_RGB_COLORS, (void**)&frame.pixels, 0, 0);
SelectObject(frame_device_context, frame_bitmap);
frame.width = LOWORD(lParam);
frame.height = HIWORD(lParam);
} break;
default: {
return DefWindowProc(window_handle, message, wParam, lParam);
}
}
return 0;
}
Build with GCC:
gcc main.c -lgdi32
Or vc with this build script (download here):
call "C:\Program Files\Microsoft Visual Studio\2022\Community\VC\Auxiliary\Build\vcvarsall.bat" x86_amd64
cl main.c -Fe:a.exe user32.lib gdi32.lib
pause
You may need to edit the directory in the first line, or run "Developer Powershell for VS 2022" from your start menu and skip the first line.
Code Walkthrough
We’ll look at the code in two parts: the GDI back end which takes a pixel array and copies it to the window, and the front end where we fill that pixel array however we want.static BITMAPINFO frame_bitmap_info;
static HBITMAP frame_bitmap = 0;
static HDC frame_device_context = 0;
GDI needs these three main structures to copy a pixel array to a window. BITMAPINFO details our pixel format. HBITMAP encapsulates the bitmap info and array data. The HDC points to the bitmap handle. It’s redundant, but we have to play by GDI’s rules.
    frame_bitmap_info.bmiHeader.biSize = sizeof(frame_bitmap_info.bmiHeader);
    frame_bitmap_info.bmiHeader.biPlanes = 1;
    frame_bitmap_info.bmiHeader.biBitCount = 32;
    frame_bitmap_info.bmiHeader.biCompression = BI_RGB;
    frame_device_context = CreateCompatibleDC(0);
Before the window is created we fill out the bitmap info header with information that’s never going to change about our pixels. The size of the “bmiHeader” has to be set, and the number of color planes is always one. Our bits per pixel is 32; 8 bits per byte, a byte for each of red, green, blue and a filler byte. The compression type is uncompressed RGB. We create the device context handle, then create the window as usual.
        case WM_SIZE: {
            frame_bitmap_info.bmiHeader.biWidth  = LOWORD(lParam);
            frame_bitmap_info.bmiHeader.biHeight = HIWORD(lParam);

            if(frame_bitmap) DeleteObject(frame_bitmap);
            frame_bitmap = CreateDIBSection(NULL, &frame_bitmap_info, DIB_RGB_COLORS, (void**)&frame.pixels, 0, 0);
            SelectObject(frame_device_context, frame_bitmap);
When a window is created it will actually process several messages before letting our program continue; that is to say it’ll both receive and process messages before we ever call “PeekMessage” and “DispatchMessage”. One message which is always processed once when the window is created with the WS_VISIBLE flag is WM_SIZE. This message will also be given to us whenever the window is resized, so it’s the one ideal place to assign the size of our pixel array and finish setting up our GDI bitmap.
We get the width and height of the window from the “lParam” passed in with the message. If our bitmap object was already created, we delete it, then create a new bitmap with the unchanged info from before and the new width and height. DIB_RGB_COLORS just tells CreateDIBSection what kind of data we’re using, and we pass a pointer to our pixel array pointer. CreateDIBSection will fill our pixel array pointer with an address to some memory big enough to hold the type and quantity of pixels we want, based on the width, height and bits per pixel.
Now we’ve created a bitmap object, we use SelectObject to point our device context to it. Our GDI objects and pixel array memory are setup so now we need to tell GDI to copy the pixels over to the window.
        case WM_PAINT: {
            static PAINTSTRUCT paint;
            static HDC device_context;
            device_context = BeginPaint(window_handle, &paint);
            BitBlt(device_context,
                   paint.rcPaint.left, paint.rcPaint.top,
                   paint.rcPaint.right - paint.rcPaint.left, paint.rcPaint.bottom - paint.rcPaint.top,
                   frame_device_context,
                   paint.rcPaint.left, paint.rcPaint.top,
                   SRCCOPY);
            EndPaint(window_handle, &paint);
        } break;
All window drawing has to happen inside the WM_PAINT message. In order to enable window drawing we call BeginPaint, which fills out this PAINTSTRUCT and gives us a device context handle for painting. The only painting function we need is BitBlt, which will copy our pixel array data over to the window in the specified rectangle. We give it the window painting device context, and the left, top, width and height of the area we want to repaint. Here you could pass in 0, 0, window width, window height, but I follow the conventions and pass in the paint structure rectangle instead. Windows can send you PAINT messages when things occur such as part of your window getting covered and uncovered by another window, and will only actually redraw the part of the window that the paint structure dictates anyway, even if you tell it to redraw the entire window here. Next is the device context of our pixel array, and the top-left corner to start copying from. Finally the raster operation code. We just want to copy our pixels over to the window, but there are several other operations available which you could check out for a bit of fun.
Side-note about BitBlt: Alternatively you could use either StretchDIBits or SetDIBitsToDevice. To use either of these functions, instead of creating the HBITMAP object and such, you can allocate the memory for the pixel buffer yourself in the WM_SIZE event like so:
frame.pixels = realloc(frame.pixels, 4 * frame.w * frame.h);
And then call either of these two functions between BeginPaint and EndPaint:
            StretchDIBits(device_context, x, y, w, h, 0, 0, frame.w, frame.h, frame.pixels, &frame.bitmap_info, DIB_RGB_COLORS, SRCCOPY);
            SetDIBitsToDevice(device_context, x, y, frame.w, frame.h, 0, 0, 0, frame.h, frame.pixels, &frame.bitmap_info, DIB_RGB_COLORS);
These both result in "nicer" code with fewer lines and in particular allow you to allocate your own pixel array memory. However I ran some benchmarks and found that these options were about 2% slower than BitBlt which is why I chose it. Since Windows' libraries are closed source it's difficult to find out exactly why each function might be slower or faster but if you have more information about these I'd be glad to hear it.
If we don’t call EndPaint everything seems to run fine, but the documentation tells us to, so we do. When dealing with closed-source libraries it’s usually best to follow instructions as you never know if an edge-case could mess up your program, or if the library could be updated later.
        InvalidateRect(window_handle, NULL, FALSE);
        UpdateWindow(window_handle);
In games we usually want to redraw the full window many times per second, so at the end of the main program loop we call these two functions. InvalidateRect marks a section of the window as invalid and needing to be redrawn. Passing in NULL invalidates the entire window. UpdateWindow immediately passes a WM_PAINT message to WindowProcessMessage rather than waiting until the next message processing loop, and that allows us to redraw the window whenever we want rather than waiting for Windows to tell us to.
That’s all the GDI back-end stuff, so let’s look at the front-end now.
struct {
    int width;
    int height;
    uint32_t *pixels;
} frame = {0};
I created this “frame” structure to hold just the information our game’s drawing routines are interested in: width, height and the pixel array. The pixel array is allocated by CreateDIBSection in the WM_SIZE message handling, and we set the width and height at the same time.
In the main program loop you can do whatever you want to fill the pixel array. Pixel 0 ends up being drawn at the bottom-left of the window, with the next pixel being drawn one to the right until the row is complete, then the next row up is drawn. To index to a specific pixel you could write frame.pixels[y * frame.width + x]. You need to skip past each row to get to the correct y coordinate, then go along that row to the correct x coordinate.
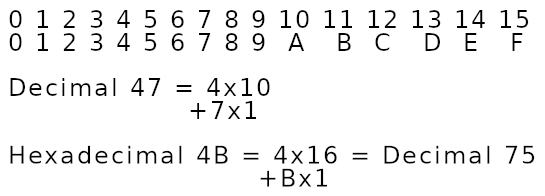 A byte has 256 possible values and each hex digit has 16. 16 x 16 is 256, so each byte can be represented by two hex digits. The bytes of a pixel written in hex, then, look like “0x” (the hexadecimal notation) [filler filler] [red red] [green green] [blue blue]. So for a fully red pixel you’d write 0x 00 FF 00 00. Blue is 0x 00 00 00 FF. A combination like red+green to make yellow is 0x 00 FF FF 00. White is 0x 00 FF FF FF and black is all 0s. So to make the pixel at 3 across, 10 up red, write frame.pixels[10 * frame.width + 3] = 0x00FF0000. Just make sure you don’t access the pixel array outside the bounds, as that will either overwrite some other memory or crash your program.
For the sake of demonstration I’ve chosen to set each pixel in order to a random value one per frame, while “erasing” another random pixel to black:
A byte has 256 possible values and each hex digit has 16. 16 x 16 is 256, so each byte can be represented by two hex digits. The bytes of a pixel written in hex, then, look like “0x” (the hexadecimal notation) [filler filler] [red red] [green green] [blue blue]. So for a fully red pixel you’d write 0x 00 FF 00 00. Blue is 0x 00 00 00 FF. A combination like red+green to make yellow is 0x 00 FF FF 00. White is 0x 00 FF FF FF and black is all 0s. So to make the pixel at 3 across, 10 up red, write frame.pixels[10 * frame.width + 3] = 0x00FF0000. Just make sure you don’t access the pixel array outside the bounds, as that will either overwrite some other memory or crash your program.
For the sake of demonstration I’ve chosen to set each pixel in order to a random value one per frame, while “erasing” another random pixel to black:
    while(!quit) {
        static MSG message = { 0 };
        while(PeekMessage(&message, NULL, 0, 0, PM_REMOVE)) { DispatchMessage(&message); }

        static unsigned int p = 0;
        frame.pixels[(p++)%(frame.width*frame.height)] = Rand32();
        frame.pixels[Rand32()%(frame.width*frame.height)] = 0;

        InvalidateRect(window_handle, NULL, FALSE);
        UpdateWindow(window_handle);
    }
With that we have an automatically resizing pixel array we can fill however we want, which gets passed over to Windows via GDI and drawn to our window every game loop.
If you've got questions about any of the code feel free to e-mail me or comment on the youtube video. I'll try to answer them, or someone else might come along and help you out. If you've got any extra tips about how this code can be better or just more useful info about the code, let me know so I can update the tutorial. Thanks to Froggie717 for criticisms and correcting errors in this tutorial. Cheers.